Tuesday, January 26, 2016

Chicken and Waffles


As many things as I’ve eaten in my life chicken and waffles has never been one of them.  I really don’t know why, I’ve had the opportunity but it just didn’t strike me as something I would like.  Boy was I wrong!!  Today I just got some idea that chicken and waffles would be good for dinner, and it was.
Normally I would make my waffles from scratch, but I had some of the mix in the pantry that needed to get used.  In usual Real Housewife style I did change it up, I substituted half of the water for buttermilk.
I asked my hubs if you were supposed to put syrup on the chicken and waffles or what.  And that got me thinking, it needed a gravy, but one with maple.  I’ve never made a maple syrup gravy so I was kind of winging it with how much syrup to add.  I didn’t want it to be super sweet, but I also didn’t want for the flavor not to be present.  The end result was soooooo delicious.
Let’s just say I will be putting chicken and waffles on my menu rotation.

For the Recipe:

Waffles, I used a premade mix

Fried Chicken:

1 whole fryer, instead of cutting into 8 pieces I did 6, then de-boned the breast and cut it into 1″ thick pieces
seasoning for the chicken, I just used a basic seasoning blend
buttermilk
2 c. flour
1/4 c. cornstarch
Oil for frying

Season the chicken well, put in a bag and cover with buttermilk.  Let sit for a couple hours.  Heat oil to 350 F in a heavy pot.  Mix the flour and cornstarch.  Shake off the excess buttermilk from the chicken and dredge in the flour mix.  Carefully place the chicken in the hot oil, do not crowd the pot.  Drain the chicken when it’s done cooking.  I placed the chicken in the oven on a baking sheet lined with paper towels on 315F to keep warm while I made the waffles and gravy, which didn’t take very long.
DSC_0705[1]

For the Gravy:

4 tbsp. butter
4 tbsp. flour
2 c. chicken stock
salt and pepper to taste
1/4 tsp. cayenne pepper, this amount gives barely a hint of heat
1/2 c. maple syrup, please use real maple syrup

In a saucepan melt the butter, then stir in the flour.  Continue stirring until it’s completely mixed and starts to turn a little golden.  Slowly add the chicken stock, be sure to stir while doing this.  Let the gravy thicken, about 4-5 minutes.  Taste for seasoning, add salt and pepper to your liking then add the cayenne pepper.  Reduce the heat to low and add the syrup.  Cook for a minute or two.
Now you are ready to plate up.  Place a waffle on a plate, next top with a piece of chicken, and drizzle with the syrup.
Enjoy!!

Saturday, January 23, 2016

Saving Money in the Garden


Yesterday I had a play date with Mrs. Farmer and her two boys, the kids played while we picked out seeds for the coming garden.  The initial goal was to buy seeds together in order to cut the cost and waste.  Some packets of seeds have so many you will never use in a season (not that you can't save them, if stored properly) so it makes sense to share with another person.  While we were going through the catalog I mentioned that a goal of mine this year was to get most of my vegetables from my garden and not the store, then added, "because I'm going to use the money I save for a trip to Europe".  Her response....laughter and "you can't save that much money from a garden".  Granted my statement was meant as a joke, but then I started thinking, there has got to be ways to really save money with all this.

It seems pretty basic, dirt, seeds and water equals a garden.  Unfortunately, there is more t to it than that.  My goal is to have a nice garden that produces vegetables my family will use and do it with minimal amount of money.  Do I think I'm going to be able to save so much money my family will be traveling to Europe on it, no, not even close.

Share Seeds:
Even though Mrs. Farmer and I ended up not sharing seeds it really is a good way to save money.  Tomatoes, peas, beans, pumpkins, zucchini or a few that would be good to share.  There's usually more seeds than any one person is going to use.  If you are ordering them and they don't offer free shipping or you haven't met the required amount for it then you will save money by sharing that cost as well.

Grow From Seed:
For a few dollars you get a packet of seeds that will yield many plants.  Take tomatoes for instance, they are usually five or so dollars for a plant ready to go in the ground with a few flowers already on it, but the packet of seeds will give you many more.  Yes, you have to put in the work, but it's all about saving some money.

Use What You Have:
Look around your yard for items that work in your garden.  Have lots of trees, use their branches to make a trellis for your peas.  People are always complaining about how invasive bamboo can be, well did you know the stalks make excellent trellises, offer to cut some down for said complainer.  Rocks, don't overlook rocks, they make great boarders, especially if you have the big ones.

Raid Your Kitchen:
Food containers make excellent seed starting containers.  They are food safe, only need a few holes in the bottom to be ready and you are doing something other than tossing more garbage into the trash.  Yogurt containers are plentiful in my home so those are my go to seed starter.  I have tried using egg cartons but find they mold and become unstable way before the seedling is ready to be transplanted.  The only mild success I've had with them is with peas, but maybe it's just me. Also, be keeping those fruit and vegetable scraps for your compost.  I know this isn't always possible for people that live in apartments or a term I read on someone's blog "high maintenance suburbia" but if you can it is a great way to amend your soil on the cheap.

Don't Get Sucked In:
I love going to garden shows, all the fancy nurseries, flipping through gardening magazines, however, all those fancy and flashy gardens come at a cost.  Use them as ideas then go home and recreate a similar look on the cheap.  One item that always cracks me up are the plant markers.  Yes, they are super cute at the end of the rows standing there all pretty letting everyone know what is growing, but those things can be expensive.  I was looking at some that were $14.95 for one, not a pack, ONE.  There were no diamonds on it, no Swarovski crystals dangling, no, it was a little stick with a decorated piece of wood that said "basil".  Um, no thanks....  Pinterest can be your friend, after an hour (or six), you will have garden ideas for days.  Get the kids involved, call it an art project because we all know they love those.

Most of all, have fun.  Being outside, enjoying the sun, getting some exercise (gardening counts, just ask my doctor), spending time with the kids and getting some home grown vegetables, that's what it's all about.  I use gardening as math lessons with my kids as well, we count seeds, rows, plants, etc... It's good cheap fun I tell ya!

Now that the chickens are confined to their area my garden stands a chance this year.  Crossing my fingers I have updates and pictures to share as the season progresses.

Friday, January 22, 2016

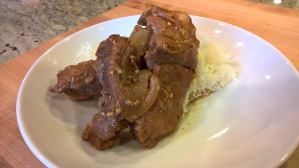
Filipino Adobo

WP_20150519_19_31_35_Pro
I have had many dishes of Filipino adobo, some sweeter than others, my favorite being the less sweet.  That tart vinegar taste just keeps me coming back for more.  Sometimes I use chicken, sometimes pork, really depends on what I have and what I’m in the mood for, today was pork.  If you like a sweeter adobo than by all means up the sugar amount.

For the Recipe:

3 tbsp. canola oil
2 medium onions, chopped
1 rack of pork ribs (could easily substitute chicken) cut into individual ribs
4-6 cloves of garlic
3 bay leaves
1 tsp. white pepper
2 tsp. black pepper
1 tsp. salt, or to taste
3/4 c. soy sauce
1 c. vinegar
2 tbsp. sugar
In a large sauté pan heat the oil, add the onions and let them brown up a bit.  Add the cut up ribs to brown, about 5-6 minutes total, flipping halfway though.  Add garlic, bay leaves, both peppers, and salt, stir well.  Add soy sauce, vinegar and sugar, give a good stir, cook for 45 minutes, or until ribs are tender.
Serve with rice so you can soak up all that yummy sauce.  Enjoy!

Favorite Chocolate Chip Cookie


I don't have a large repertoire of cookie recipes.  In fact, I rarely bake them.  Of course during the holidays I pull out my festive cookie recipes and go to town, but other than that, not so much.  So lately I've been wanting to find a good chocolate chip cookie recipe that wasn't super doughy or filled with a bunch of big chunks of stuff.  I just wanted a basic chocolate chip cookie that was a little crisp on the outside and soft and chewy on the inside, and I've found it.  I was reading a few articles on how tweaking certain ingredients affects taste and texture, so played around a bit and found what I was looking for in a cookie.

I started with the most popular chocolate chip cookie recipe, the Nestle Toll House.  I think they are a tad too doughy, too sweet and not enough nuts.  So I adjusted a few things and came up with this.... Of course you can omit the nuts, and I do when it's going to be just for Mr. Housewife and the twinadoes.

Recipe:
  • 2 1/4 cups all-purpose flour
  • 1/2 tsp. baking soda
  • 1/2 tsp. baking powder
  • 1 tsp. salt
  • 1 c. (2 sticks) butter, room temperature
  • 2/3 c. granulated sugar
  • 3/4 c. packed brown sugar
  • 1 teaspoon vanilla extract
  • 2 large eggs
  • 1 1/2 c. chocolate chips
  • 1 1/4 c. chopped nuts
Preheat oven to 375 F
Combine flour, baking soda, baking powder and salt in small bowl. Beat butter, granulated sugar, brown sugar and vanilla extract in large mixer bowl until creamy.  Add eggs, one at a time, beating well after each one. Slowly add in flour mixture. With a spoon, stir in chocolate chips and nuts. Drop by rounded tablespoon onto ungreased baking sheets (I like to use parchment paper on my baking sheets).
Bake for 9 to 11 minutes or until light golden brown, but don't let them get too browned or they will have a burnt taste.  Transfer them to a cooling rack.  After they have cooled, put them in an airtight container.  Will keep for several days, but these are so good they won't be around that long!